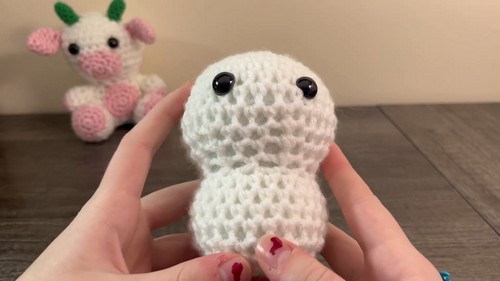
Crochet Pinky Strawberry Cow Amigurumi Pattern – For kids
Propose joy to your crochet project with the Pinky Strawberry Cow Amigurumi, a fun and vibrant addition that’s sure to brighten anyone’s day!
The adorable Pinky Strawberry Cow, will surely make pretty to your collection. Featuring a whimsical cow with a delightful pink strawberry design, this pattern is perfect for making unique gifts, cute home decor items, or playful accessories. Suitable for both beginners and experienced crocheters, the pattern provides easy-to-follow instructions that make the process enjoyable and rewarding.
Crochet Strawberry Cow

The endearing design not only highlights your crochet talents but also brings joy and a sense of achievement with every stitch. Share the happiness this lovable cow brings, and change your crochet creations into memorable treasures that brighten any day.
Materials Needed:
- White yarn
- Pink yarn
- Green yarn
- Crochet hook (5 mm recommended)
- Stuffing material
- Scissors
- Stitch marker
- Crochet needle
- Plastic eyes (or you can crochet your own)
Pattern:

Head:
Start with white yarn in a magic ring.
- Create a magic ring.
- Crochet 6 single crochets (sc) into the ring.
- Close the ring tightly.
Round 2:
- Increase in each stitch around. (12 stitches)
- Do two single crochets in each stitch around.
Round 3:
- [Increase, 1 sc] repeat around. (18 stitches)
- Alternate between two and one single crochets in each stitch (an increase followed by a single crochet).
For Round 4:
- [Increase, 2 sc] repeat around.
- Alternate an increase with two single crochets in each stitch.
Round 5:
- [Increase, 3 sc] repeat around.
- Increase followed by three single crochets in each stitch.
- Single crochet in each stitch for the next 4 rounds.
- Simply work a single crochet into each stitch around for 4 rounds.

Start decreasing for the head:
- [Decrease, 3 sc] repeat around.
- Next round: [Decrease, 2 sc] repeat around.
- Next round: [Decrease, sc] repeat around.
Insert eyes and stuff the head:
- Place the eyes and fill with stuffing.
Body:
- Resuming from the head, start increasing again as you begin the body.
- Rounds similar to initial increasing rounds on the head: Increase for a few rounds as explained previously.
- Single crochet around for the next 4 rounds.
- Decrease for shaping the body.
- Decrease following the pattern used in the head decrease rounds.
- Stuff the body and complete the final decrease round.
- Stuff firmly and decrease all around for the last round.
- Finish and close off.
- Use a needle to weave through the last remaining loops, pull tight, and fasten.
Legs (Make 2):
- Start with pink yarn using a magic ring.
- 6 sc in the ring, close it tightly.
- Place your stitch marker.
- Increase around (12 stitches).
- Alternate increase and sc around.
- After pink rounds, change to white yarn and work as instructed in the head and body pattern.
Arms (Make 2):
- Follow a similar pattern to legs, starting with a magic ring, increasing, and then switching to white yarn as done for the legs.
Ears (Make 2) & Other Details:

- Ears use pink yarn starting with a magic ring.
- Begin smaller than other components and follow an increasing pattern before switching to sc around and then decreasing.
- Tail and horns.
- Start with white for the tail, switch to green as desired, use a smaller hook for horns.
- Crochet spots and muzzle using pink.
- Begin with magic rings, increase, and shape them as detailed.
Final Assembly:
- Sew all parts together in their proper places, ensuring everything aligns symmetrically where needed.