
Amazing Crochet Celtic Knot Granny Squares Pattern
Inject playful elegance into your crochet projects with this Celtic knot granny squares pattern, blending tradition and creativity seamlessly.
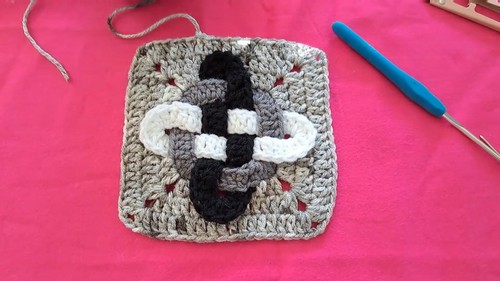
It can offers a beautiful and intricate design that marries traditional motifs with the beloved granny square technique. This versatile pattern can be used to create stunning blankets, pillow covers, table runners, and even bags, adding an elegant and unique flair to your projects. The interwoven knots not only enhance the visual appeal but also add a touch of cultural heritage and timeless style to your finished items.
Crochet Celtic Knot Granny Squares

Crocheting these squares can be a relaxing and fulfilling experience, perfect for both beginners and advanced crocheters seeking to expand their skills. One of the key benefits of this pattern is its adaptability; you can customize the size and color scheme to suit your personal taste or match your home decor.
Tip:
To ensure your Celtic knots stand out, use a contrasting color for the knotwork against a solid background to highlight the intricate details.
Materials Needed:
- Scissors
- Darning needle
- Crochet hook (4 mm)
- Four different colors of #4 weight worsted weight acrylic yarn
Instructions:
Creating the Oval Components:
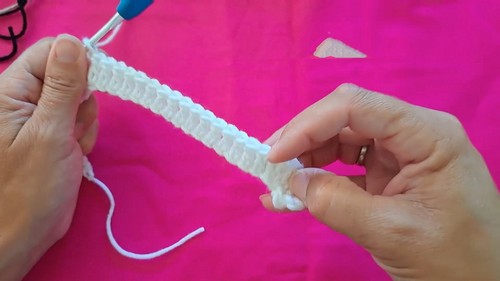
- Start with your first color of yarn.
- Create a slip knot and chain 36.
- Double crochet (DC) into the fourth chain from the hook.
- In the next stitch, make 4 DCs.
- DC once into each of the next 16 stitches.
- In the next stitch, make another 4 DCs.
- DC once into each of the next 14 stitches.
- Pull up a loop and tie off, leaving ends for sewing.
- Repeat the above steps using the second color of yarn.
Creating the Circle and Joining:
Switch to your third color of yarn.
- Create a slip knot and chain 28.
- Slip stitch into the first chain to form a circle.
- Chain 3 (counts as first DC). DC into the next stitch.
- Make 4 DCs into the next stitch.
- DC once in each of the next 6 stitches.
- Repeat the pattern two more times: “4 DCs in one stitch, 1 DC in the next 6 stitches”.
- Slip stitch into the top of the initial chain 3 to join.
- Tie off, leaving ends long for weaving.
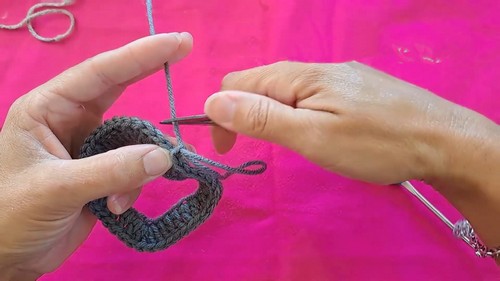
Integrate the oval pieces:
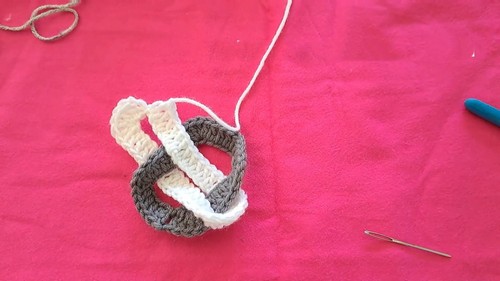
- Overlap the ovals and the circle according to the video instructions using the darning needle to sew them together at designated points to form knots and intersections.
Creating a Square Frame:
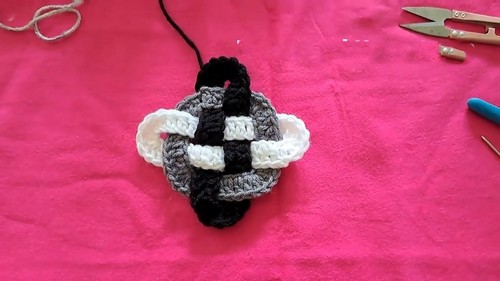
Switch to your fourth yarn color.
- Attach yarn to a corner of the assembled piece.
- Chain 3, then work 2 DCs, chain 2, and 2 more DCs in this corner.
- Continue around the piece, working DCs in a pattern and creating corners with “2 DCs, chain 2, 2 DCs”.
- Complete each side of the square by chaining and linking back to the start with a slip stitch.
Final Touch:
Continue to expand the square by adding rows.
- Start each row with a chain 3, follow the pattern to lay DCs along the sides, and maintain corner configurations.
- Work through several rounds to expand the square until the desired size is reached.
- Attach the layers and loops as necessary to maintain the Celtic knot design.
Finish off:
- Weave in all ends with the darning needle.
- Block your piece if desired.
Completion:
- Congratulations, you’ve just crafted a Celtic knot granny square! Add a border or join several squares to make a larger project. Enjoy your creation!


