Simple Cozy Crochet Gift Card Stockings Step By Step Pattern
Holiday cheer with our free crochet gift card stockings pattern, perfect for adding a unique and personal touch to your festive gifting.
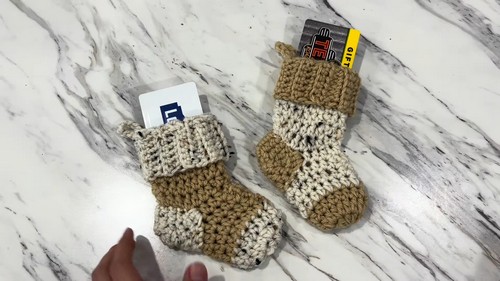
These petite stockings, beautifully designed with intricate stitches and festive details, are ideal for holding gift cards, small goodies, or even as charming tree ornaments. Their delicate appearance and timeless beauty make them a standout addition to any holiday décor.
Crochet Gift Card Stockings

With easy-to-follow instructions, this pattern ensures that even beginners can create these stylish and functional pieces. Choose from a range of yarn colors to match your festive theme and create a series of these delightful stockings to bring joy and elegance to your holiday celebrations.
Tip:
Use metallic or sparkly yarn to add an extra touch of glamour and festivity to your crochet gift card stockings.
Supplies Needed
- Yarn: Number 4 weight yarn in Tweed and Tan colors (Premier Yarns suggested)
- Crochet Hook: 6 mm
- Additional Tools: Paperclip (as stitch marker), scissors, tapestry needle
Steps:
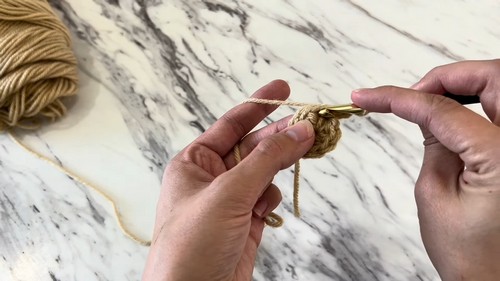
Make a Magic Ring:
- Wrap tail over pointer and ring finger, looping yarn around.
- Insert hook to catch and pull yarn through to form the ring.
- Chain 1 to secure.
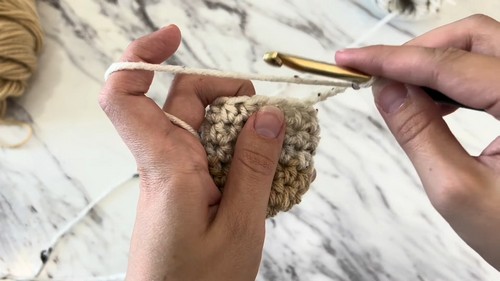
Round 1:
- Work 8 half double crochets (HDC) into the magic ring.
- Pull tail to close the ring tightly.
- Slip stitch into the first HDC to join.
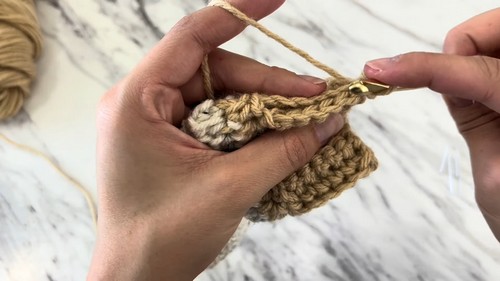
Round 2:
- Chain 2. Work 2 HDC into every stitch around.
- You should have 16 stitches.
For Round 3:
- Chain 2. Work 1 HDC into each stitch around.
- Total of 16 HDCs.
- On last HDC, change to Tweed yarn.
- Continuing with Tweed Yarn
Round 4 to 6:
- Work 1 HDC into each stitch around for three rows.
- Keep stitch count at 16.
Round 7:
- Work 1 HDC into next 4 stitches, chain 8 (for stocking loop), skip 6 stitches, then HDC into last 5 stitches.
- Ensure you have 18 stitches by the end.
In Rounds 8 to 13:
- Continue with 1 HDC into each stitch around for a total of 6 rows.
- Change back to Tan yarn on last stitch of 6th row.
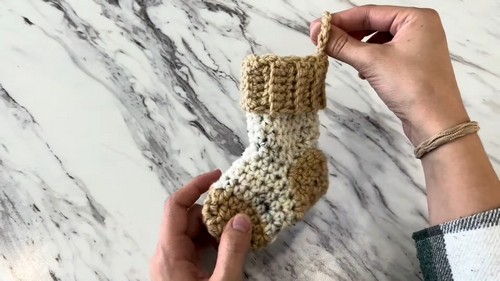
Adding Loops for Hanging:
Next Row:
- Create a hanging loop with a chain of 10, slip stitch to join.
Adding the Ribbed Top:
Ribbing:
- Chain 7. Skip the first from the hook, SC in the next 6.
- Slip stitch into the next two stitches of the previous round, then turn the work.
- Work 6 SC back loops only back down the chain.
- Keep repeating this process for ribbing around the top of the stocking, skipping the hang loop at one point.
Making the Bottom Patch:
Creating the Bottom Patch:
- Reattach Tan yarn in the center of the stocking bottom.
- Work in rounds to make a square patch, decrementing in the final rounds to gather the bottom.
- Secure and weave in ends with a tapestry needle.