Simple And Easy Crochet Beach Bag Pattern For Beginners
“Vibrant and stylish Free Crochet Beach Bag Pattern – perfect for carrying all your summer essentials with ease while adding a splash of color to your look!”
This chic accessory combines functionality with timeless beauty, designed to carry all your beach essentials effortlessly. The pattern showcases intricate crochet techniques that result in a visually stunning and durable bag, complemented by stylish details that ensure it stands out. Its spacious design offers ample room for towels, sunscreen, and snacks, while the sturdy handles make it easy to carry.
Crochet Beach Bag Pattern

The versatile color options allow you to personalize your bag, making it the perfect accessory for any sunny day. Whether you’re lounging by the shore or exploring seaside markets, this fantastic project adds a touch of sophistication to your ensemble. The easy-to-follow instructions make it a delightful project for both new and experienced crochet enthusiasts.
Tip:
Choose a water-resistant yarn to ensure your beach bag stays looking fresh and vibrant all summer long.
Materials Needed:
- 100 m of 6 mm Monomi Studio Macramé Cord
- 8 mm crochet hook
- Scissors
- Lighter
- Leather label (optional for branding)
Pattern:
Preparing the Cord:
- Cut the end of the cord and carefully burn the end a little bit with a lighter (it’s polyester and melts slightly, which prevents fraying).
Starting the Bag:

Make a knot with the cord.
- Chain 25 stitches for the base of the bag.
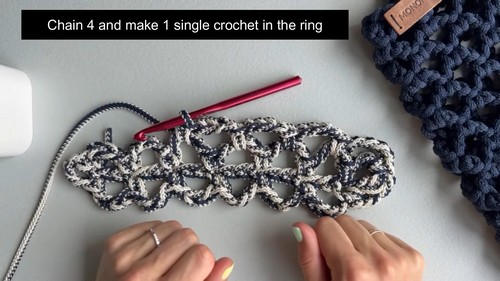
- Skip six chains, then make a single crochet in the seventh chain to form a ring.
Creating the First Row of Rings:
- Chain 4, skip two stitches, single crochet into the third stitch.
- Repeat this pattern six times for a total of seven rings (including the initial ring from the starting point).
Working Both Sides of the Chain:
- After creating the first row of seven rings, repeat the previous step on the opposite side of the chain to form another set of rings mirroring the first set.
Building the Body of the Bag:
For every subsequent round: Chain 4, then single crochet into the middle of each ring.
- Continue this pattern without any joining stitches at the end of each round.
- Keep going until you have eight complete “holes” from top to bottom.
Making the Handles:

Once you’ve reached the height of eight holes, you will start working on the handles.
For each handle:
- Begin by lightly doing an i-cord stitch: keeping loops on the hook, dropping them, then picking them back up while chaining in between.
- Work this way until you have a handle long enough for your preference (the example mentions doing this for 24 times).
- Attach the end of the handle back into the body of the bag by counting three rings from where you began, then single crochet into that ring, pulling through all loops.
Repeat steps to create the second handle on the opposing side.
Finishing Touches:
- To finish the bag, chain two after attaching the second handle and perform a slip stitch in the next two stitches to secure.
- Cut the cord, burn the end slightly, and hide the end by weaving it into the stitches.

Adding Labels:
- If you’re using a leather label, sew the label onto your bag in your desired location for a professional touch.