Sweet Crochet Mini Basket Pattern Perfect For Keepsakes
Make charming storage solutions with our Free Crochet Mini Basket Pattern, merging functionality with a touch of handmade love and creativity.
This delightful pattern is perfect for crocheting small, adorable baskets that are both functional and decorative. Featuring easy-to-follow instructions, it’s an ideal project for both beginners and seasoned crocheters. These mini baskets are perfect for organizing small items like keys, jewelry, or crochet supplies, and they make wonderful handmade gifts for friends and family.
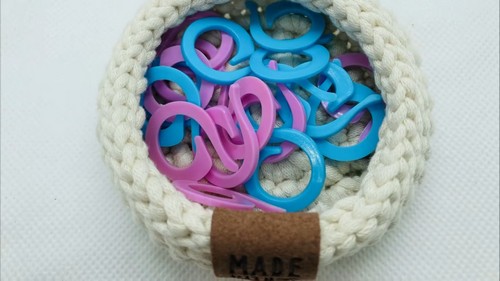
Crochet Mini Basket

The pattern allows for customization in colors and sizes, giving you the freedom to create baskets that fit your personal style and needs. Whether you’re looking to declutter in a charming way or add a unique handmade touch to your decor, this crochet pattern is a must-try.
Tip:
Use stiff cotton yarn to ensure your mini basket holds its shape and stands sturdily.
Materials Needed:
- Bulky yarn (Burnet Maker used in the tutorial)
- 4 mm crochet hook
- Stitch markers (recommended)
- Darning needle
- Scissors
Pattern Steps

Starting Loop:
- Create a slip knot.
- Chain 4 stitches.
- Slip stitch into the first chain to form a ring.
Row 1:
- Work 5 single crochets (sc) into the ring.
Row 2:
- Work 2 sc in each stitch around (10 sc total).
For Row 3:
- Repeat the pattern from Row 2, working 2 sc in each stitch around (20 sc total).

Row 4:
- Work 1 sc in each stitch around (20 sc total).
Row 5:
- Work 2 sc in each stitch around (40 sc total).

In Row 6:
- Work a special stitch called the “yarn over slip stitch” in the front loops only, all around (40 stitches).
Row 7 to 9:
- Work 1 sc in each stitch around for three rows, keeping stitch count at 40.
Row 10:
- Close the project using a slip stitch variation worked in back loops only.
- This creates a decorative edge and finishes the rim of the basket.
- Remove the stitch marker and join the last stitch with a slip stitch for a seamless finish.
Finishing Touches:
- Cut the yarn, leaving a small tail.
- Pull the tail through the last loop on your hook and pull tight to secure.
- Weave in the ends using the darning needle, hiding the tail within the stitches.

Adding Handmade Tag (Optional):
- Sew a ‘handmade’ tag into the basket for a personalized touch.