Adorable Crochet Mohair Beanie Pattern For Baby & Adult
Warm your winter days with our Free Crochet Mohair Beanie Pattern, offering a touch of love and comfort through a soft, cozy beanie.
This delightful project is perfect for making a stylish and cozy accessory. Mohair yarn, known for its lightweight and luxurious feel, adds a soft and fluffy texture, making the beanie incredibly comfortable to wear. This pattern is suitable for crochet enthusiasts of all skill levels, offering an enjoyable challenge with its mix of basic stitches and unique design elements. Simple to make, this beanie brings together the beauty of crochet and the plush comfort of mohair.
Crochet Mohair Beanie

The beanie is perfect for keeping warm in colder months, and its breathability ensures comfort without overheating. Available in various colors, there’s room for personalization to match any winter wardrobe. The finished product is not just practical—it’s also a fashionable piece that can add a touch of sophistication to any outfit.
Tip:
For best results, make sure to use a larger hook size to keep the stitches loose and to highlight the mohair’s soft texture.
Materials:
- Yarn: Lion Brand 24/7 Cotton (Worsted weight, 100% cotton) and Drops Alpaca Silk (Worsted weight, the actual material used is alpaca silk but referred to as mohair for its texture).
- Hook: 4 mm crochet hook.
- Additional: Scissors, tapestry needle.
Pattern:

Foundation and Row 1:
- Start with a slip knot and chain 43.
- Turn your chain and work into the back bumps of the chain.
- Single Crochet (SC) into the second chain from the hook; continue with SC for a total of 34 stitches.
- Slip Stitch (SS) in the next chain.
- Leave the remaining chains unworked.

Row 2:
- Turn your work, do not chain 1.
- SC right back into the SS and down the row you just created, using the back loops only for SC.
Forming the Pattern:
- Each following row will start with a turn, then SC in back loops only.
- The end of each row will extend one stitch into the unworked foundation chain before ending with a SS. This creates a gradual increase along one side.
Follow this pattern:

Row 3:
- 36 SC + SS.
Row 4:
- Work back.
After Row 5:
- 38 SC + SS.
Row 6:
- Work back.
Row 7:
- 40 SC + SS.
For Row 8:
- Work back.

Row 9:
- 42 SC + SS.
Row 10:
- Work back, completing the pattern repeat.
- Continue repeating these steps, minus the initial chain, until the piece is long enough to wrap around your head.
- The original instruction was to repeat this pattern seven times.

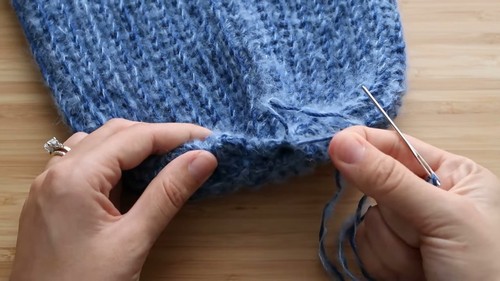
Closing the Hat:
- After the final row, cut a long tail for sewing.
- Sew the seam together matching the outside loops (right loop of right side to the left loop of left side).
- Close the top of the hat by running the yarn through the last row’s stitches and pulling tight.
- Weave in all ends.

Finishing Touches:
- Turn the hat right-side out, fold the brim to your liking, and wear it proudly!
- Remember, the creator emphasized working with both yarns together, keeping the tension even throughout.
- Also, it was noted the unique technique used in this hat creates a nicely tapered and fitting shape that’s quite simple once you get the hang of it.
- The total time estimated to make the beanie is about four hours.