
Cute And Decent Crochet Granny Square Cardigan Pattern
Warm your heart with our free crochet granny square cardigan pattern, bringing love and timeless beauty to every stitch.
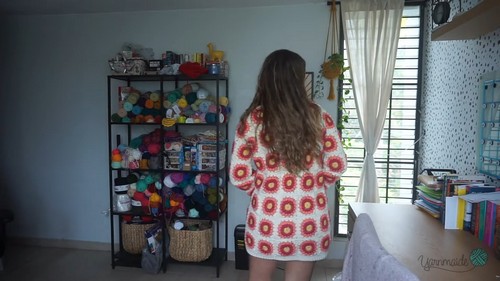
The Crochet Granny Square Cardigan Pattern is a wonderful way to make a timeless and cozy garment. Suitable for both beginners and experienced crocheters, this pattern uses classic granny squares to form a stylish and practical cardigan. It’s perfect for layering, providing warmth while remaining fashionable.
Crochet Granny Square Cardigan

With the ability to customize colors and yarn types, each cardigan reflects personal style. The repetitive process of making granny squares can be calming, promoting relaxation and creativity. A significant benefit of this pattern is its versatility in adapting to various sizes and styles, offering a comfortable fit for all. Making your own cardigan also supports sustainable fashion choices.
Tip:
For a professional finish, block your granny squares before assembling them to ensure even edges and a neat appearance.
Materials:
- Yarn: Various colors of your choice (worsted weight recommended)
- Crochet hook: 5.7mm
- Tapestry needle
- Scissors
- Buttons (optional)
Abbreviations:
- ch: chain
- sc: single crochet
- dc: double crochet
- sl st: slip stitch
Granny Square Pattern:
Round 1:

Make a magic ring.
- Ch 2 (counts as 1 dc), dc 3 in the ring.
- Ch 3, dc 3 in the ring. Repeat twice more.
- Sl st to the first dc, fasten off, and weave in ends.
Round 2:
Join yarn in any corner space, ch 1.
- Dc 3 in the same corner space, ch 3, dc 3 in the same corner space.
- Ch 1, dc 3 in the next sp, ch 3, dc 3 in the next sp. Repeat around.
- Sl st to the first dc, fasten off, and weave in ends.
For Round 3:
- Join yarn in any corner space, ch 1.
- Dc 3 in the same corner space, ch 3, dc 3 in the same corner space.
- Ch 1, dc 3 in the next sp. Repeat around.
- Sl st to the first dc, fasten off, and weave in ends.
Round 4:
- Join yarn in any corner space, ch 1.
- Dc 3 in the same corner space, ch 3, dc 3 in the same corner space.
- Ch 1, dc 3 in the next sp. Repeat around.
- Sl st to the first dc, fasten off, and weave in ends.
Round 5:
- Join yarn in any corner space, ch 1.
- Dc 3 in the same corner space, ch 3, dc 3 in the same corner space.
- Ch 1, dc 3 in the next sp. Repeat around.
- Sl st to the first dc, fasten off, and weave in ends.

For Round 6:
- Join yarn in any corner space, ch 1.
- Dc 3 in the same corner space, ch 3, dc 3 in the same corner space.
- Ch 1, dc 3 in the next sp. Repeat around.
- Sl st to the first dc, fasten off, and weave in ends.
Sweater Assembly:
Create granny squares:
- Make a sufficient number of granny squares in various colors based on your desired sweater size.
Layout:
- Arrange the squares in a desired pattern for the sweater. The video suggests a layout with two front panels, a larger back panel, and two sleeve panels.
Sewing panels:
- Sew the squares together in panels using a tapestry needle and yarn.
Joining panels:
- Sew the panels together to form the sweater shape.
Sleeves:
- Create sleeve panels by joining granny squares together.
- Attach the sleeves to the body of the sweater.

Border (optional):
- Crochet a single crochet border around the bottom edge and sleeves for a finished look.
Ribbing:
- Crochet a ribbed border using a crochet knit stitch for the bottom edge and cuffs.
Buttons:
- Attach buttons to the front of the sweater.


