
Stylish & Comfort Crochet Daisy Cardigan Pattern For Newbie
Delight in the charm of our Free Crochet Daisy Cardigan Pattern, a playful and stylish way to bring warmth and vibrant floral flair to your wardrobe!
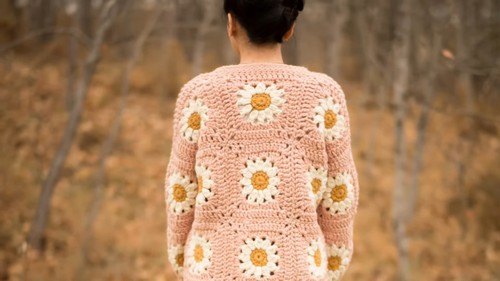
It can presents a delightful fusion of playful design and practical wearability, offering a unique take on classic crochet artistry. This pattern brings to life the whimsical appeal of daisies, intricately woven into a cozy cardigan that adds a burst of floral charm to any outfit. With its finely detailed stitch work, each element of the pattern is crocheted to create a piece that is both visually striking and comfortably functional.
Crochet Daisy Cardigan

The cardigan is versatile enough for any season—layer it over a summer dress or pair it with your favorite jeans for a fresh, lively look. Its design caters to both advanced crocheters looking for a creative challenge and enthusiastic beginners eager to expand their skills. Available in sizes for everyone, this cardigan pattern encourages personal expression through color and yarn choice.
Tip:
Experiment with contrasting yarn colors to make the daisy motifs truly stand out and create a bold fashion statement.
Materials:
- Yarn: Worsted weight yarn in desired colors
- Crochet hook: 5.5mm
- Tapestry needle
- Scissors
- Stitch markers
- Buttons (optional)
Abbreviations:
- ch: chain
- sc: single crochet
- dc: double crochet
- sl st: slip stitch
Granny Square Pattern:
- Refer to the video tutorial linked in the video description for the Daisy granny square pattern.

Cardigan Assembly:
Back Panel:
- Crochet the required number of Daisy granny squares for the back panel based on your size.
- Whip stitch the granny squares together, following the video tutorial for joining techniques.
Front Panels:
- Crochet the required number of Daisy granny squares for each front panel.
- Whip stitch the granny squares together.
- Add rows of double crochet stitches to the sides of the front panels as needed for your size.

Joining Panels:
- Place the front panels on top of the back panel.
Whip stitch the shoulders and sides together, leaving space for armholes.

Bottom Ribbing:
- Switch to a 7mm crochet hook.
- Join yarn and chain 7.
- Work single crochets in the back loops of the chains.
- Work two slip stitches into the next two stitches along the bottom edge.
- Turn your work and work six single crochets in the front loops of the previous row.
- Chain one and turn.
- Repeat rows 5 and 6 until the desired length of the bottom ribbing is reached.
- Work slip stitches to join the ends of the ribbing.
Collar:
- Join yarn and chain one.
- Work single crochets across the top edge of the front panels, including chain spaces and seams.
- Switch to a 10mm crochet hook.
- Chain one and turn.
- Work loose slip stitches in the front loops of the previous row.
- Repeat rows 4 and 5 to create the desired height of the collar.
Sleeves:
- Seam four granny squares together for each sleeve.
- Add rows of double crochet stitches for width if needed.
- Join the sleeve in a round and work double crochet decreases to shape the sleeve opening.
- Crochet a ribbed cuff using slip stitches.
- Seam the sleeve to the armhole.
Finishing:
- Weave in all ends.
- Block the cardigan for a neat finish.
- Add buttons if desired.


