
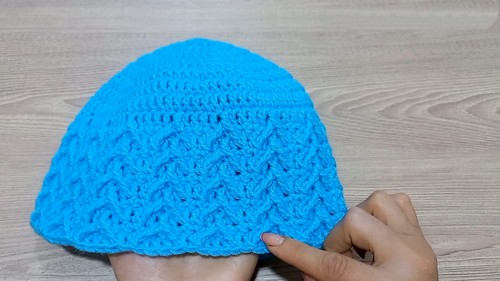
Crochet Beautiful Arrow Beanie Hat Pattern Suitable For All
Step up your winter wardrobe with the Free Crochet Beautiful Arrow Beanie Hat Pattern – achieve cozy, stylish headwear that’s as fun to make as it is to wear!
This elegant pattern is a perfect blend of style and warmth. This exquisite pattern mutate simple yarn into a fashionable accessory that not only keeps you cozy but also turns heads wherever you go. Ideal for both beginners and seasoned crocheters, this pattern offers a unique arrow design that adds a delightful touch of texture to any outfit. With its versatile use, you can wear it on chilly morning walks, snowy outings, or casual gatherings.
Crochet Beautiful Arrow Beanie Hat
The vision behind this beanie is to combine functionality with high fashion, providing you with a timeless piece that you’ll cherish for years.
Tip:
Use a yarn with a slight sheen to enhance the arrow design and give your beanie a luxurious finish.
Materials Needed:
- Worsted weight yarn
- 5mm crochet hook
Pattern Overview:

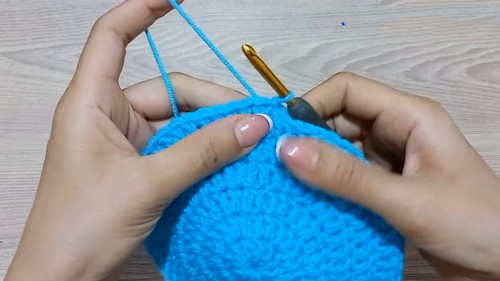
Starting Ring & Round 1:
- Start with a slip knot, chain 4, join with a slip stitch to form a ring. Chain 2 (does not count as a stitch), make 10 double crochets (DC) into the ring. Join with a slip stitch to the first DC.
Round 2:
- Chain 2 (not a stitch), make 2 DC in each stitch around. Skip the initial 2 chains and join with a slip stitch to the first DC. You’ll have 20 DC.
In Round 3:
- Chain 2, make 2 DC into the first stitch, then 1 DC in the next stitch. Repeat the sequence around, ending with 30 DC in total. Join with a slip stitch.
Round 4:
- Chain 2, 2 DC in the first stitch, then 1 DC in each of the next two stitches. Repeat around to have 40 DC. Join with a slip stitch.
Round 5:
- Chain 2, 2 DC in the first stitch, then 1 DC in each of the next three stitches. Repeat around, ending with 50 DC. Join with a slip stitch.
For Round 6:
- Chain 2, 2 DC in the first stitch, then 1 DC in each of the next four stitches. Repeat around for a total of 60 DC. Join with a slip stitch.
Round 7:
- Chain 2,2 DC in the first stitch, then 1 DC in each of the next five stitches. Repeat around for 70 DC in total. Check the diameter – it should be approximately 6.5 inches or 17 cm for an adult size. Join with a slip stitch.
Rounds 8-9:
- Chain 2, 1 DC in each stitch around, no increases. Join with a slip stitch at the end of each round.
For Round 10:
- Turn work, chain 1, 1 single crochet (SC) into each stitch around. Join with a slip stitch.
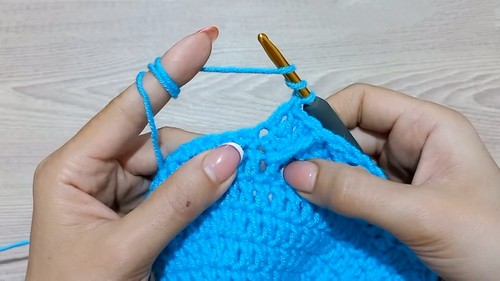
Round 11 (Arrow Stitch Pattern):
- Chain 2, turn work. Start making arrow stitches:
- Skip the slip stitch, work a starter of a DC, but don’t complete.
- Yarn over twice, make a front post triple crochet around the third DC from two rounds below, but don’t complete.
- Yarn over, pull through all loops on the hook.
- Make 3 DC behind this stitch, then a front post triple crochet, yarn over, and pull through all loops on the hook to complete the Arrow Stitch.
- Continue the sequence of 5 stitches to form the Arrow Stitch pattern around. Join with a slip stitch.
Round 12:
- Turn work, chain 1, 1 SC into each stitch around. Join with a slip stitch.
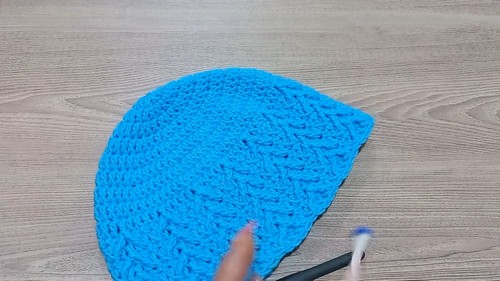
Repeat Rounds 11 and 12:
- Continue the pattern for the desired height of the hat.
Finishing Rounds:
- After completing the desired number of Arrow Stitch pattern repeats, finish by working a round of SC for a clean edge. Fasten off and weave in ends.
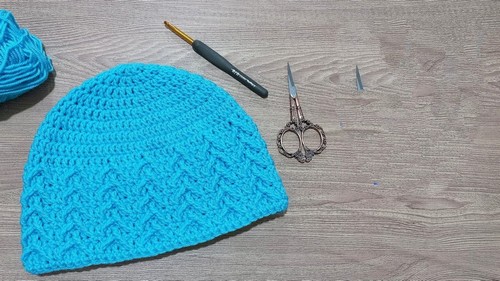
Final Steps:
- Once you’ve reached the desired height, work the last round in single crochet on the wrong side to create a neat edge. Join with a slip stitch, cut the yarn, leaving a tail, and pull it through to fasten. Weave in any loose ends.


