
Simple & Easy Crochet Granny Square Cardigan Pattern
Uncover the charm of our Free Crochet Granny Square Cardigan Pattern, offering a vibrant and timeless layer to enrich your wardrobe with color and style.
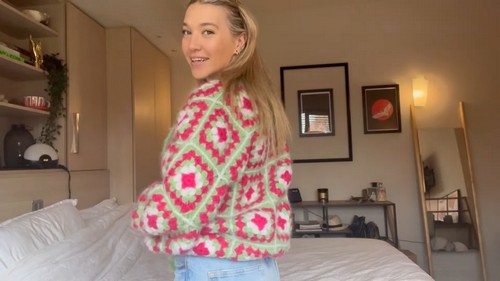
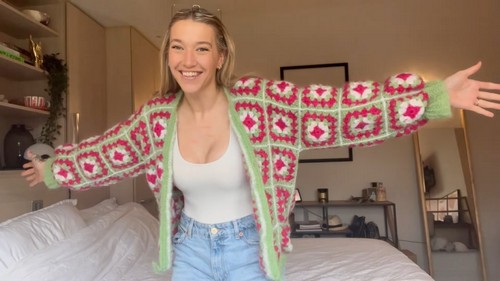
This eye-catching piece features an array of vibrant, hand-stitched squares, each showcasing intricate geometric designs that blend tradition with modern trends. The cardigan’s open-front style and relaxed fit make it a versatile staple, effortlessly complementing casual outfits or adding a playful twist to more polished ensembles.
Crochet Granny Square Cardigan

With countless color combinations to explore, you can personalize your cardigan to reflect your unique taste and creativity, making it a standout addition to any wardrobe. Perfect for transitional weather, the granny square cardigan offers a lightweight layer that balances warmth and breathability, ensuring comfort and style through the seasons.
Tip:
To achieve uniform squares, block each granny square before assembling the cardigan for a professional, polished finish.
Materials:
- Yarn: Various colors of your choice (worsted weight recommended)
- Crochet hook: 3.5mm
- Tapestry needle
- Scissors
- Buttons (optional)
Abbreviations:
- ch: chain
- sc: single crochet
- dc: double crochet
- sl st: slip stitch
Granny Square Pattern:
Round 1:

Make a magic ring.
- Ch 2 (counts as 1 dc), dc 3 in the ring.
- Ch 3, dc 3 in the ring. Repeat twice more.
- Sl st to the first dc, fasten off, and weave in ends.
For Round 2:
Join yarn in any corner space, ch 1.
- Dc 3 in the same corner space, ch 3, dc 3 in the same corner space.
- Ch 1, dc 3 in the next sp, ch 3, dc 3 in the next sp. Repeat around.
- Sl st to the first dc, fasten off, and weave in ends.
Round 3-6:
- Join yarn in any corner space, ch 1.
- Dc 3 in the same corner space, ch 3, dc 3 in the same corner space.
- Ch 1, dc 3 in the next sp. Repeat around.
- Sl st to the first dc, fasten off, and weave in ends.
- Repeat rounds 3-6 to create the desired size granny square.

Sweater Assembly:
Create granny squares:
- Make a sufficient number of granny squares in various colors based on your desired sweater size. The video used approximately 83 squares.
Layout:
- Arrange the squares in a desired pattern for the sweater. The video suggests a layout with two front panels, a larger back panel, and two sleeve panels.
Sewing panels:
- Sew the squares together in panels using a tapestry needle and yarn.
Joining panels:
- Sew the panels together to form the sweater shape.
Sleeves:
- Create sleeve panels by joining granny squares together.
- Attach the sleeves to the body of the sweater.
Border (optional):
- Crochet a single crochet border around the bottom edge and sleeves for a finished look.
Ribbing:
- Crochet a ribbed border using a crochet knit stitch for the bottom edge and cuffs.
Buttons:
- Attach buttons to the front of the sweater.


