Step By Step Guide Crochet Sunflower Drawstring Bag – Free Pattern
Inspired and charming, the Free Crochet Sunflower Drawstring Bag Pattern lets you create a vibrant, stylish bag that adds a sunny touch to any ensemble.
This pattern is perfect for holding daily essentials, this charming bag combines practicality with aesthetic appeal, making it an ideal project for crochet enthusiasts of all levels. The pattern showcases a beautiful sunflower motif, bringing a touch of sunny elegance to your wardrobe. It’s versatile enough to use as a market bag, beach tote, or a stylish everyday carry-all.
Crochet Sunflower Drawstring Bag Pattern
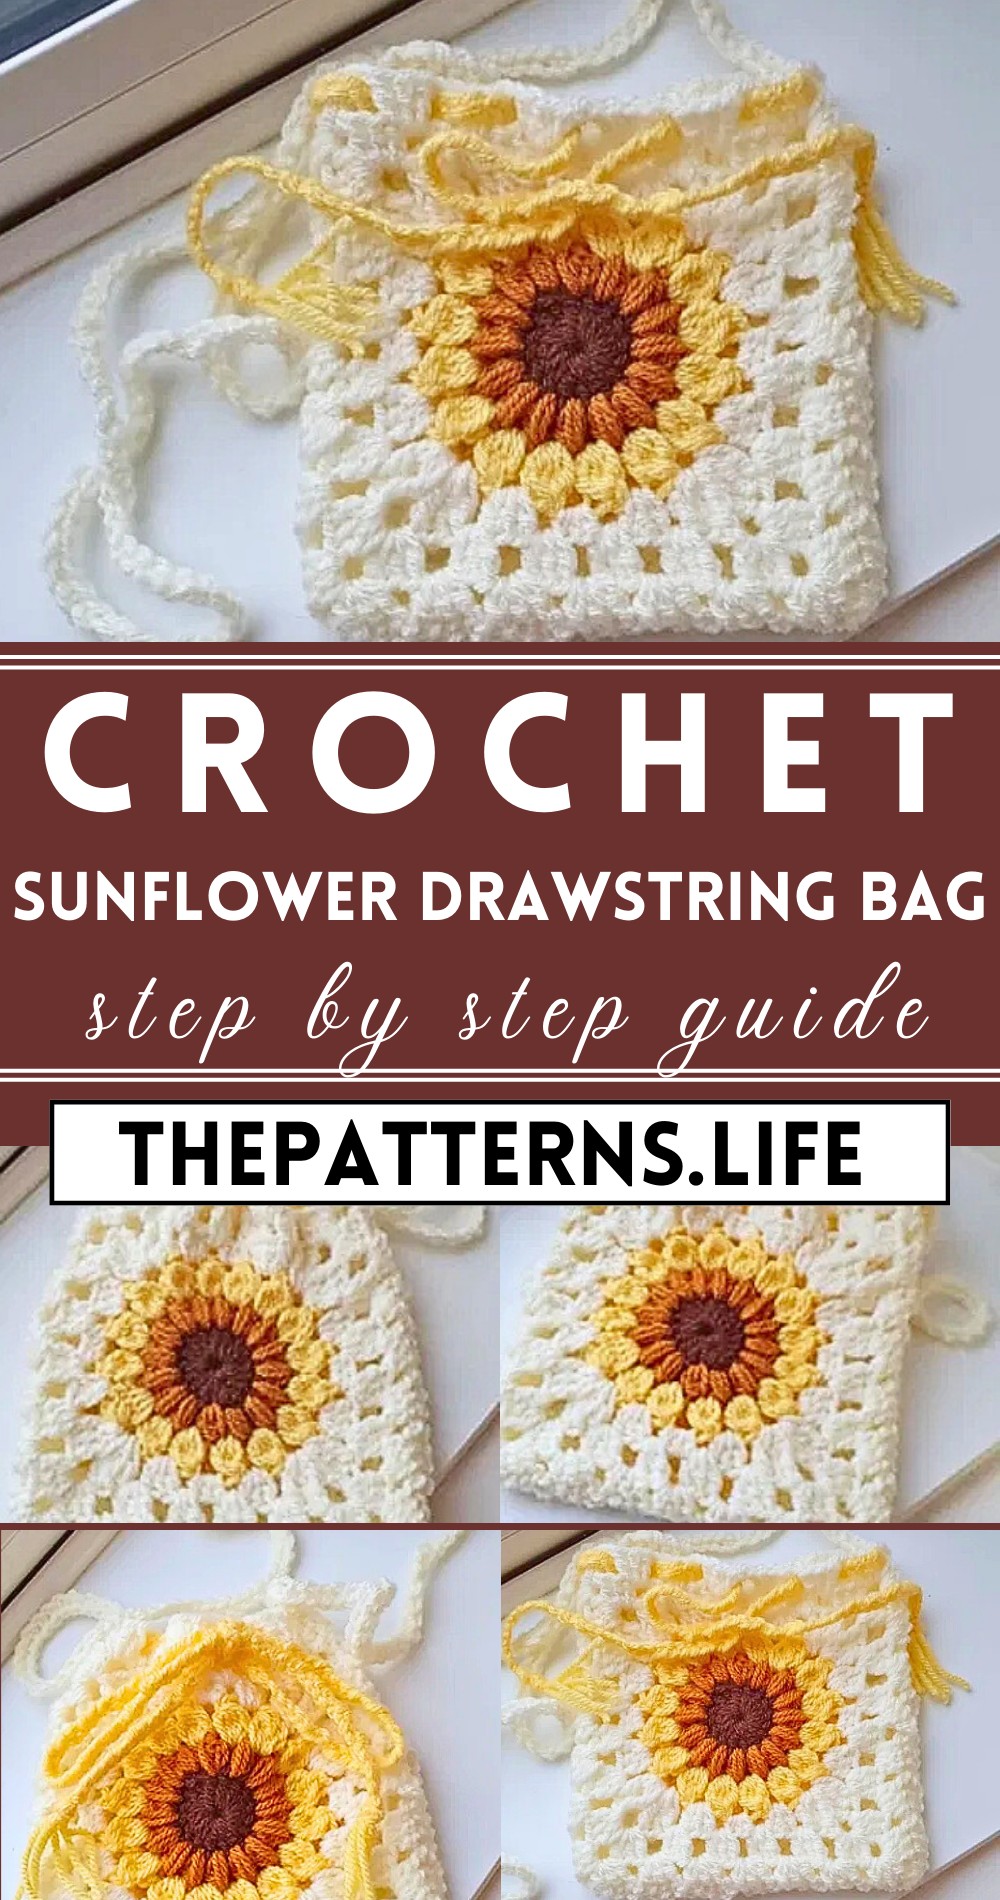
The Crochet Sunflower Drawstring Bag Pattern offers a delightful way to create a vibrant, functional accessory. Made with sturdy yet soft yarn, the drawstring design ensures your items stay secure while providing easy access. The detailed instructions and visual guides make the process straightforward and enjoyable.
Tip:
For an added touch of durability and style, consider lining the interior with a complementary fabric, enhancing both the look and longevity of your handmade sunflower bag.
Crochet Granny Square Bag Pattern
Materials:
- Hook (5mm)
- Yarn (I recommend Paintbox DK Aran, but any Cotton Aran will do)
- Tapestry needle
- Scissors
Abbreviations:
- Mc – Magic Circle
- Ch – Chain
- Sl st – Slip Stitch
- Sc – Single Crochet
- Dc – Double Crochet
- Tr – Treble Crochet
- Hdc – Half Double Crochet
Instructions:
Round 1:
Start with your first color. Make a magic circle or chain 5 and join to form a loop. Chain 3 (this counts as your first DC). Make 15 DC into the loop. Join to the top of the first stitch and fasten off. You should have 16 stitches in total.
Round 2 – Puff Stitches:
Attach your second color and chain 2. Then, Yarn over, insert hook into the same stitch as the chain 2 and pull up a loop to the height of a DC (you should have three loops on your hook). Repeat this step twice more for a total of 7 loops on your hook. Pull through all 7 loops and chain 1 to secure the stitch. Repeat these steps all the way around until you have 16 puff stitches. Join to the top of the chain 2 with a slip stitch and fasten off. You should have 16 stitches.
Round 3 – Cluster Stitches:
Attach your third color in the spaces between the puff stitches and chain 3. Then, Yarn over, insert your hook between two puff stitches and pull up a loop. Yarn over and pull through two loops. You should have 2 loops on your hook. Make 3 more incomplete DC to have five loops on your hook. Pull through all five loops and chain 2 to secure the stitch. Repeat in every space around until you have 16 cluster stitches. Join to the top of chain 3 with a slip stitch and fasten off. You should have 16 stitches.
Round 4 – Creating the Square:
Attach your fourth color in any space from the previous round and chain 3 (this counts as your first DC). Make 2 additional DC in the same space. In the next space, work 3 TR, chain 2, and 3 more TR for the corner. In the next space, work 3 DC, 3 HDC in the next space, and 3 DC in the final space. Repeat from * to * three more times. Join with a slip stitch into the top chain 3 of your first DC. Do not fasten off.
Rounds 5 – 6 – Extending the Square:
Chain 3, make two more DC in the same space, then chain 1. Make 3 DC in the next space, chain 1, then at the corner make 3 DC, chain 2, 3 DC, and chain 1. Repeat from * to * around, join with a slip stitch to the top of the third chain of your first chain 3. Finish round 6, make a slip stitch and fasten off. Weave in your ends.
Finishing the Bag:
Repeat the same process for a second granny square. Once you have two squares, join three sides together, leaving the top open. Place the right sides together, attach the fourth color at a corner and chain 1. SC in each stitch along the sides, placing one SC in each corner. Continue around the second and third side, and join with a slip stitch into the last stitch. Do not fasten off. Finally, flip your work right-side out and your bag is now ready!
Now for the strap
From where you finished your sl st, you now want to ch as many as you want. I chained around 150! (I honestly lost count, I just continued until I felt I was happy with the length!). It is a really nice length and reaches just past my hips (I’m 5”1!)
Once you’ve done the length of chain that you are happy with, sl st into the other side to secure and then go back over in SC in the chain to give a bit more strength to the strap. Slst again once you reach back to the opposite side. Fasten off.
Drawstring
You will want to cut 6 pieces of yarn about 30-40” (all depending on the size you have made your bag). Knot all 6 pieces together. You then want to start plaiting them together until you get to the end or your desired length.
You want to split the plait in 3, so 2 strands together. This just makes it thicker with a more desired effect. Once you have come to the end, just knot the ends together so that they are secure.
Weave through the holes of your granny clusters. Make sure both ends are equal and tie them in a bow. Then voila! There we go! You have your very own drawstring bag!