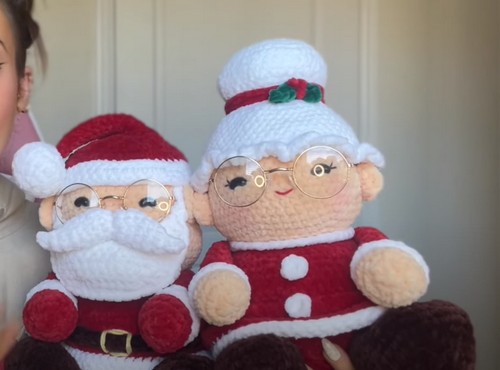
Crochet Funny Santa Claus Amigurumi Pattern
Celebrate the holidays with our free crochet Funny Santa Claus, perfect for adding a touch of festive cheer to your handmade creations.
It is Ideal for all crocheting skill levels, this pattern guides you through the steps to create a cute Santa Claus that’s both funny and festive. Whether it’s used as a cheerful holiday decoration, a heartwarming gift, or a little playful addition to your seasonal decor, this project offers complete joy.
Crochet Santa Claus Amigurumi Tutorial

The process of crocheting this amusing Santa is relaxing and fun, resulting in a delightful creation that will bring smiles to everyone. Each stitch brings to life a jolly Santa that captures the essence of holiday spirit. With a bit of yarn and a crochet hook, you can create a unique and charming Santa that embodies the joy and magic of the festive season.
Supplies:
- Yarn: Super bulky (weight category 6), in colors: Red (Cardinal), White, Skin (Shell), Chocolate (for feet and belt), and a bit of yellow acrylic yarn for the belt buckle.
- Hook: 6 mm crochet hook.
- Other: Darning needles (curved recommended), thin red and white cotton thread, safety eyes (17mm), small pieces of pipe cleaner, stuffing, lap counter, stitch markers, sewing clips, optional glasses for Santa.
Abbreviations:
- R: Round
- RO: Row
- SC: Single Crochet
- CH: Chain Stitch
- SL: Slip Stitch
- DEC: Decrease
- INC: Increase
- BL: Back Loop
- BLO: Back Loop Only
- FL: Front Loop
- FLO: Front Loop Only
Pattern:

Starting with the Head:
- Magic Ring: Start with a magic ring and make 6 SC in the ring.
- Round 2-8: Follow a series of SC and increases across several rounds to expand the head, usually in a pattern where each round increases uniformly around (e.g., 2 SC, INC repeat).
- Round 9-13: SC in each stitch around for five rounds.
- Place markers for eye placement.
- Begin decreasing to shape the top of the head, typically in a mirrored fashion of the initial increases.
Hat:
- Base: Start with chain stitches, join, and then work a few rounds of SC to create the brim.
- Building Up: Switch colors (to red), and continue with rounds of SC, followed by consistent decreases to taper the hat.
- Final Touch: Create a pom-pom for the hat tip using SC rounds, incorporating increases, and then decreases to form a ball. Attach to the hat.
Body:

- Start with a magic ring and increase rounds to widen for Santa’s belly.
- Continue with several rounds of SC for height.
- Follow with rounds that introduce back loop only stitching for texture, then switch colors (to white) for the look of a trim or belt.
- Employ decreases to shape the lower body.
Belt and Buckle:
- Create a chain that wraps around Santa’s waist, SC across for belt width.
- Use yellow yarn to embroider a square as the belt buckle.
Beard and Mustache:
- Work flat pieces in rows for the beard, creating a frame with SC.
- The mustache requires smaller, semi-circular pieces that are lightly stuffed and attached together.
Arms and Legs:
- Begin with magic rings and increase for width.
- Switch colors where appropriate for sleeves or boots.
- Utilize decreases for shaping towards the hands and feet.
Assembly:
- Assemble all crocheted parts as indicated, attaching limbs, head, beard, mustache, and then the hat.
- Employ sewing or hot glue for parts you prefer not to stitch directly.
- Attach safety eyes, and affix any accessories like glasses.
Final Notes:
- Be sure to count your stitches as instructed for accurate shaping.
- You can adjust the size of Santa by altering the hook size or yarn weight, though this will affect the final product.