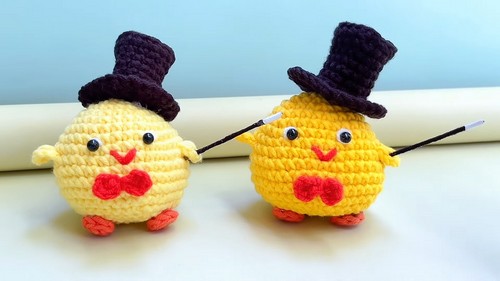
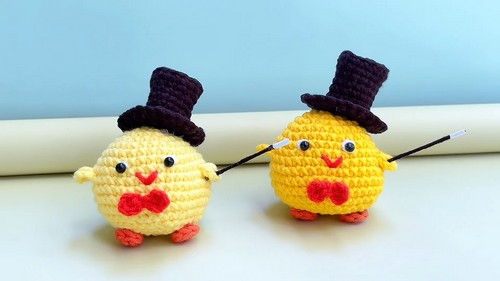
Simple Magician Chicken Amigurumi Keychain Crochet Pattern
Ineffable charm exudes from the Crochet Magician Chicken Amigurumi Keychain Pattern, create a charming and whimsical keychain friend!
This can capture attention with its miniature top hat and playful cape. His tiny feet also put charm in this project. This delightful pattern is perfect for crocheters who want to add a dash of whimsy to their keychains or bags. The endearing magician chicken brings joy and practicality, serving as an adorable companion for your keys or a unique ornament. As you indulge in the process, you’ll find a sense of relaxation and creative fulfillment, perfect for enhancing your crochet skills. Ideal as a heartfelt gift, this charming chicken spreads smiles and delight among friends and family. The vibrant and whimsical design makes it a lovely conversation starter, transforming everyday items into magical companions.
Crochet Magician Chicken Amigurumi Keychain Pattern

Materials Needed:
- Yarn
- Crochet hook
- Yarn needle
- Stuffing material
- Glue (for eyes and other accessories)
- Safety eyes or buttons (optional)
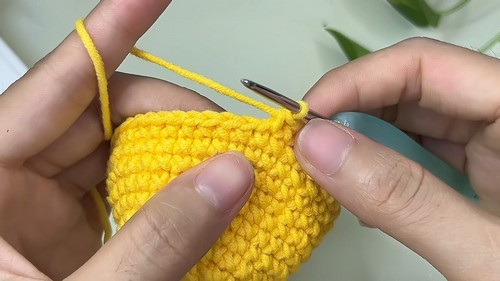
Body:

For Row 1:
- Create a magic ring and make 6 single crochets (sc) into ring.
Row 2:
- Make 2 sc into each stitch around (12 sc).
Row 3:
- 1 sc in the first stitch, 2 sc in the next stitch; repeat from to around (18 sc).
In Row 4:
- 1 sc in the first two stitches, 2 sc in the next stitch; repeat from to around (24 sc).
Row 5:
- 1 sc in the first three stitches, 2 sc in the next stitch; repeat from to around (30 sc).
Row 6:
- 1 sc in each stitch around (30 sc).
For Row 7:
- 1 sc in the first four stitches, 2 sc in the next stitch; repeat from to around (36 sc).
Row 8:
- 1 sc in each stitch around (36 sc).
Row 9:
- Repeat Row 8 (36 sc).
For Row 10:
- 1 sc in the first five stitches, 2 sc in the next stitch; repeat from to around (42 sc).
Row 11-12:
- 1 sc in each stitch around (42 sc).
Row 13:
- 1 sc in the first five stitches, then decrease by sc next two stitches together; repeat from to around.
In Row 14:
- 1 sc in the first four stitches, then decrease; repeat from to around.
Row 15:
- 1 sc in the first three stitches, then decrease; repeat from to around.
Row 16:
- 1 sc in the first stitch, then decrease; repeat from to around. Start stuffing the body.
Final Closure for Body:
- Decrease in each stitch, then slip stitch (sl st) to close the body. Cut yarn, leaving a long tail for sewing. Pull the yarn through loops to close the opening securely.
Legs (Make 2):
- Create a magic ring, make 6 sc into the ring.
- Sl st into the first sc, fasten off.
Bow:
- Start with a slip knot, chain (ch) 3.
- Into the first chain, make 1 half double crochet (hdc).
- Ch 2, sl st in the same chain.
- Repeat step 3 one more time.
- Fasten off, and wrap leftover yarn around the middle of the bow to form its center. Secure with a knot.
Hands (Make 2):
- Insert hook into a stitch on the body (suggested row 8), ch 3.
- Insert hook into another stitch, and make a double crochet (dc).
- Ch 3, sl st in another stitch. Fasten off.
Hat:
Row 1:
- Magic ring, 6 sc in ring.
Row 2:
- 2 sc in each stitch around.
In Row 3:
- 1 sc, 2 sc in next stitch; repeat from to around.
Rows 4-10:
- Sc each stitch around, adding sl st at end of rows.
Row 11:
- In front loops only, make 2 dc in each stitch around. Fasten off.
Assembly:
- Attach the legs, hands, and bow to the body.
- Glue eyes onto the body.
- Sew or glue the hat onto the head.