Crochet Amigurumi Xmas Pug – No Sew Pattern
Create holiday magic with our free crochet Amigurumi Xmas Pug Pattern, perfect for adding festive flair and fun to your seasonal decor!
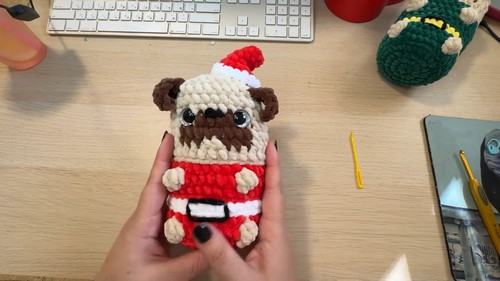
Get ready to stitch up some holiday cheer with our Crochet Amigurumi Xmas Pug Pattern! This quirky, adorable pattern is perfect for creating a festive friend who snuggles and sleighs all day. Designed with beginner-friendly instructions, it’s a great project for crocheters of all skill levels.
Crochet Amigurumi Xmas Pug

The pattern features detailed steps to crochet a charming pug decked out in a Christmas hat and belt, making it the ultimate holiday decoration or gift. Not only is this pattern fun to make, but it’s also a great way to showcase your creativity and add a handmade touch to your holiday decor. Use different yarn colors and textures to give your pug a unique personality!
Tip: Use safety eyes and stitch markers for extra precision and an adorable finish!
Materials Needed:
- Hook
- Yarn in colors A (red), B (light brown), C (white), and D (dark brown)
- Safety eyes
- Stuffing material
- Yarn needle
- Black thread (for nose and belt details)
Abbreviations:
- SC = Single Crochet
- INC = Increase (2 SC in one stitch)
- DEC = Decrease (combine two stitches into one)
- BLO = Back Loop Only
- ST = Stitch
Pattern:

Magic Ring & Body:
Round 1:
- With color A, make a magic ring. Work 8 SC into the magic ring. Join with a slip stitch and chain one.
Round 2:
- INC around (16 SC).
After Round 3:
- SC 1, INC repeat around (24 SC).

Round 4:
- SC 1, INC, SC 2 repeat until one ST left, then SC in the last ST (32 SC).
Round 5:
- SC in each ST around in BLO (32 SC).
In Round 6:
- With color A, SC 11, change to color B on the 11th stitch, work a bubble stitch, SC 7 in color A, changing back to color B for the bubble stitch, then SC 12 in color A.
Round 7:
- SC around (32 SC).
Change to color B:

Round 8:
- Slip stitch around with color C.
- Continue with color C switching back to color A when required, following the pattern of decreases and color changes as detailed in your instructions. Make sure to count your stitches in each round to ensure accuracy.

Ears:
- When you reach the ear sections (round 21), work 12 SC, then use color D for a chain of 6. Work back along the chain to form the ear shape, skip two stitches on the body, and attach the ear.
- Repeat on the other side for the second ear.

Face and Finishing:
- Insert safety eyes.
- Sew on a nose and belt with a black thread as instructed.
Stuffing and Closing:
- Finish crocheting the rounds, gradually decreasing as per the pattern until you are ready to close the project.
- Stuff the project before entirely closing it up.
- Use a yarn needle to weave through the last round and pull tight to close. Weave in the end.

Hat:
- Start with a magic ring in color A, work in rounds increasing as instructed to create the hat base.
- Switch to color C for the brim of the hat, again following the specific increases.
- Sew the hat to the top of the project.