
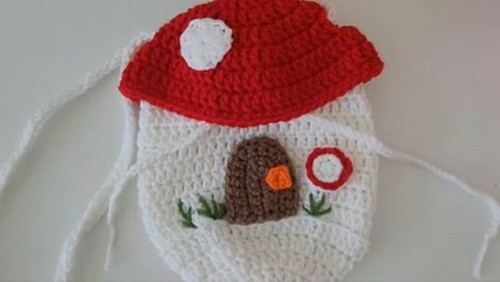
Crochet Mushroom Bag Charming Pattern With Little Fun
Get enchanted with the Free Crochet Mushroom Bag Pattern – crochet a whimsical, stylish accessory that’s perfect for adding a touch of woodland magic to any outfit!
This delightful pattern guides you through creating an adorable mushroom-shaped bag that’s both stylish and functional. Great for holding small essentials like keys, coins, and cards, this unique accessory is a conversation starter wherever you go. Its playful design features vibrant colors, textured stitches, and charming details that bring the classic mushroom shape to life.
Crochet Mushroom Bag

Step into a fairytale with the whimsical Crochet Mushroom Bag Pattern, an enchanting project perfect for adding a touch of magic to your accessories. Whether you’re a crochet novice or an experienced crocheter, this pattern is a fun and engaging way to expand your skills. Plus, it’s an excellent gift for fans of all things whimsical and handmade.
Tip:
Use sturdy, durable yarn to ensure your Mushroom Bag holds its shape well and lasts longer.
Materials Needed:
- Yarn in six colors: pink (for mushroom top), white (for mushroom spots), brown (for bag body), green (for grass), dark brown (for the door), and orange (for the doorknob).
- Category 4 yarn and a 5.5 mm crochet hook (adjust hook size if using a different yarn category).
- Darning needle.
- Scissors.
Bag Part (Base of Mushroom)
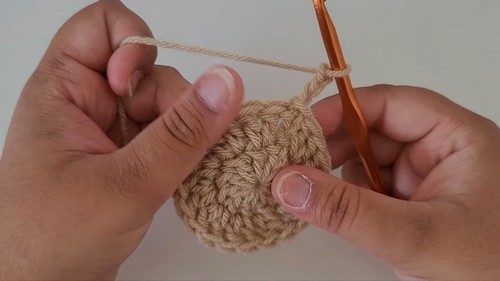
Magic Ring:
- Start with a magic ring.
Round 1:
- Chain 3, 10 double crochets (DC) into the ring. Slip stitch (SL ST) to the first DC to close round. (10 stitches)
In Round 2:
- Chain 3. Do a round of increases by making 2 DC in each stitch around. SL ST to close round. (20 stitches)
Round 3:
- Chain 3. 1 DC, then an increase in the next stitch. Repeat – around the round. SL ST to close. (30 stitches)
Round 4:
- Chain 3. Follow with 2 DC, then an increase. Repeat – around. SL ST to close. (40 stitches)
After Round 5:
- Chain 3. 3 DC, then an increase. Repeat – around. SL ST to close. (50 stitches)

Round 6:
- Chain 3. Instead of working into each stitch, work 1 DC into the back loops only all around. No increases. SL ST to close. (50 stitches)
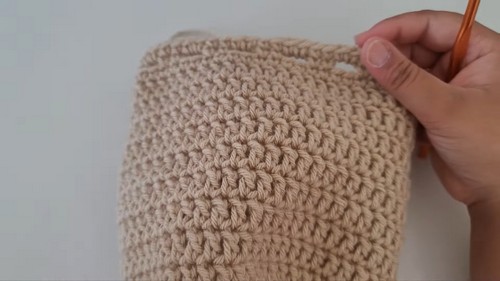
Rounds 7-14:
- Chain 3, then DC in each stitch around (normal stitches, not back loop only). SL ST to close each round. (50 stitches each round)
For Round 15:
- Chain 1, then do a round of single crochet (SC) in each stitch around. SL ST to close. (50 stitches)
Round 16:
- This round creates the eyelets for the drawstring. 2 SC, then chain 2 and skip 2 stitches. Repeat from to around. SL ST to close. (Variety in stitch count due to chain spaces)
Round 17:
- Chain 1, then work SC around, including 2 SC in each chain-2 space from the previous round. This maintains stitch count and shapes the purse’s drawstring channel.
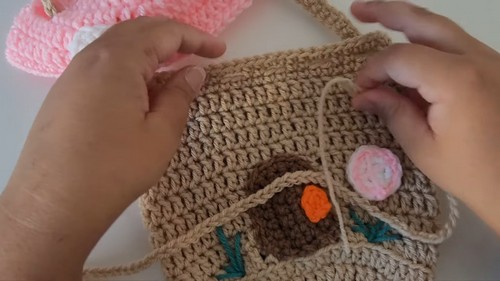
Door and Doorknob
Door:
- With dark brown yarn, chain 7.
- Starting from the second chain from the hook, make 5 SC.
- In the last chain, make 3 SC (turning the corner).
- Work another 5 SC on the other side of the chain foundation. Chain 1 and turn.
- Follow the pattern of making rows with SC, adding increases at both ends for the door’s shape over several rows.

Doorknob:
- Start with a magic ring using orange yarn.
- Chain 1, then 5 SC into the ring. Pull tight and SL ST to the first SC. Leave a long end for sewing onto the door.
Top of Mushroom:
- With pink yarn, start off as you did with the bag body, making a magic ring and follow an increasing pattern similar to the bag’s base but with modifications to create the mushroom cap shape, including the creation of holes for the drawstring.
Mushroom Spots and Window:
- Use white yarn to create several circles (magic ring, chain 3, then a series of DCs in the ring). Fasten off and leave a tail for sewing onto the mushroom cap.
- For the window, start with a magic ring, chain up, and follow a pattern to create a small square or round shape. Add a border in a contrasting color if desired.

Assembly:
- Sew the door, doorknob, windows, and mushroom spots onto the bag body and cap as desired, referring to the video for placement.
- Crochet or chain a long strap for the purse, attach it to the sides of the mushroom cap.
- Using yarn, create a drawstring and thread it through the eyelets of the purse. Tie knots at the ends to prevent fraying and to keep it in place.


