Crochet Gingerbread House Pattern – Step By Step
Festive holiday magic with Gingerbread House Pattern—perfect for crochet a delightful, cozy gingerbread house that brings cheer to any space!
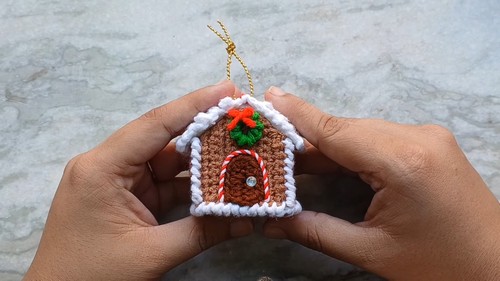
The House is the epitome of holiday charm, turning yarn into a festive masterpiece. This delightful pattern boasts intricate details, from candy canes to snowy rooftops, making it a standout addition to your seasonal décor. Ideal as a holiday centerpiece, it infuses your space with whimsy and warmth.
Crochet Gingerbread Man
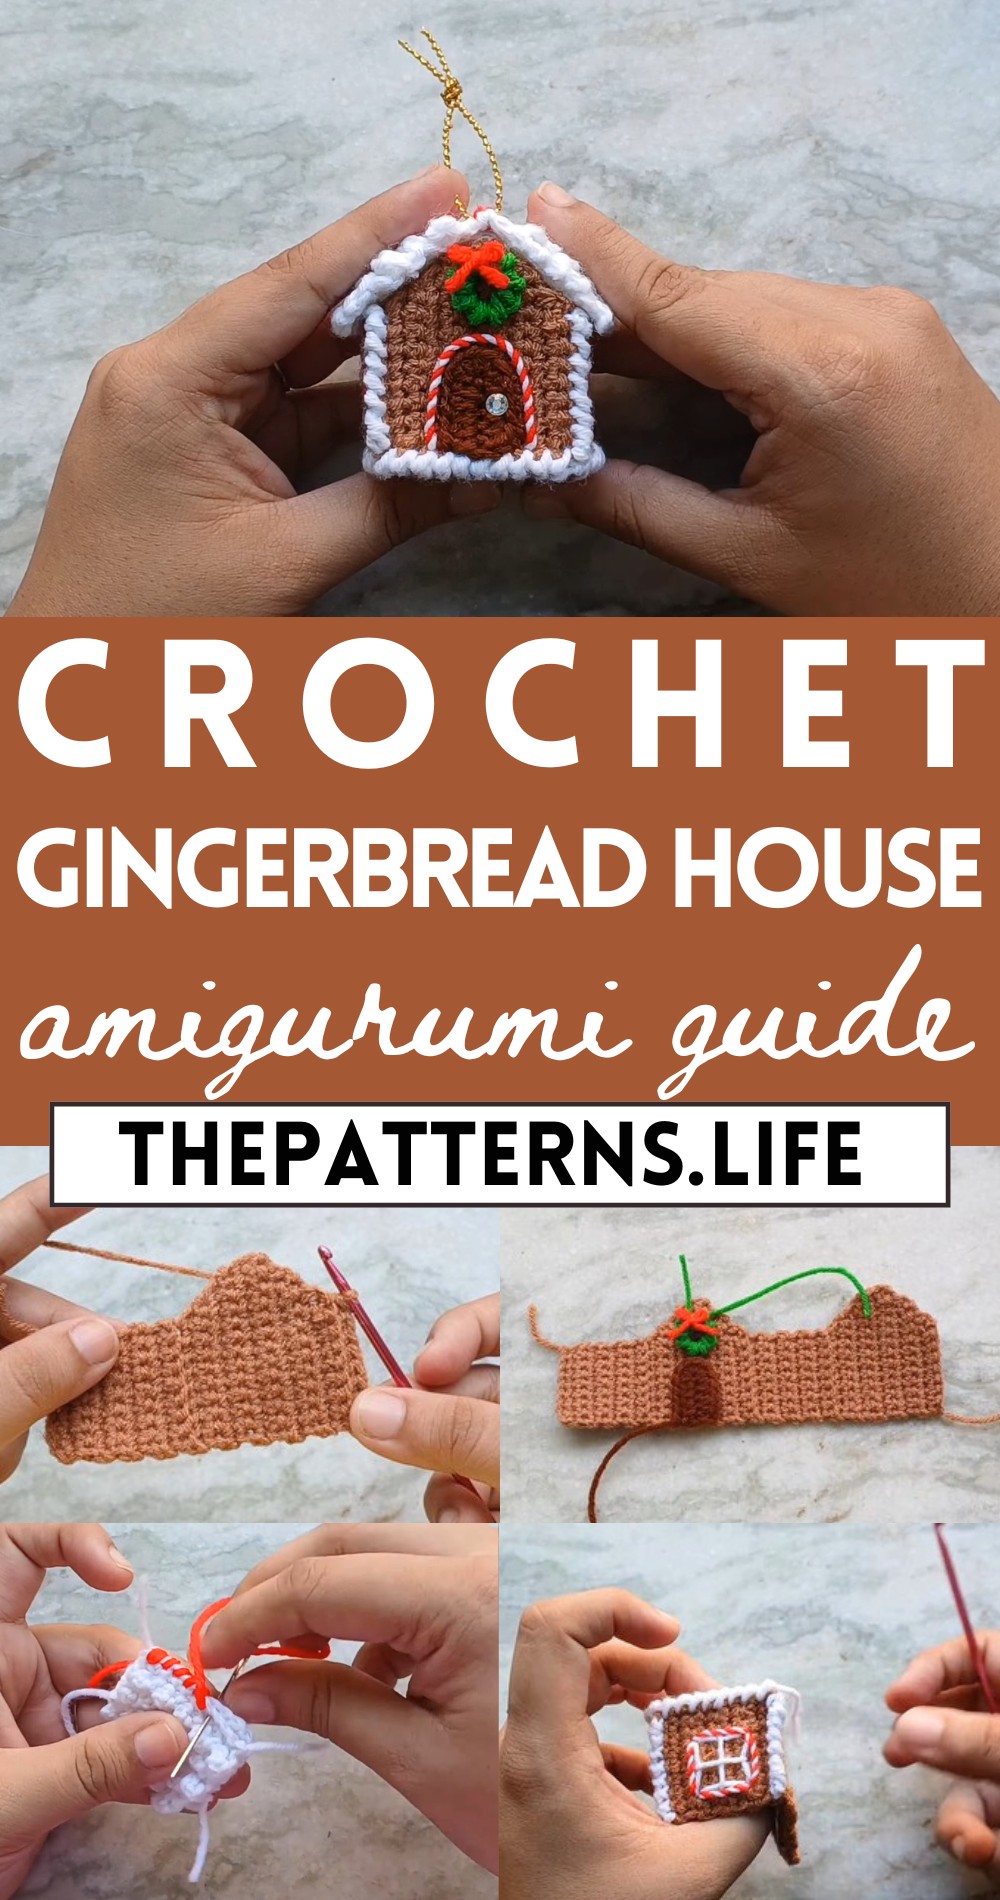
Perfect for gifting, it brings joy and a touch of handmade elegance to friends and family. Imagine it adorning your mantel or dining table, captivating guests with its cozy, nostalgic appeal. Whether you’re a beginner or a seasoned pro, this engaging pattern offers a fun and rewarding project. The end result is a beautiful decoration you’ll cherish year after year, celebrating the magic of the holidays in style. This crochet gingerbread house isn’t just a decoration—it’s a festive statement piece that brings the spirit of the season to life.
Material:
- Light brown, dark brown, red, green, and white yarn
- Golden thread for the ornament loop
- Silver rhinestone for the doorknob
- Thin cardboard (like from a cereal box)
- Fabric glue and regular school glue
- Crochet hook (3 mm is used here with 4-ply yarn)
- Yarn needle
- Scissors
Gingerbread House Pattern:
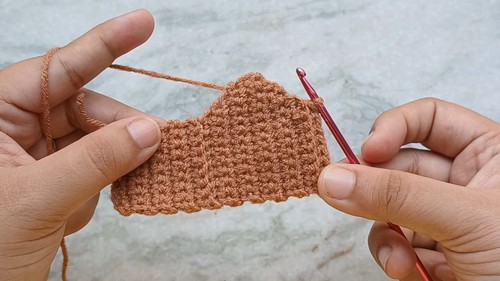
Side Wall Pattern (Make 4):
- Start with light brown yarn.
Row 1:
- Chain 9 (8 + 1 for turning), skip the first chain, make a single crochet into each of the next 8 chains. You’ll have 8 single crochets.
For Row 2:
- Chain 1 (turning chain), turn, make 1 single crochet into each stitch across.
Rows 3-8:
- Repeat Row 2.
Front Wall Pattern:
- Follow the Side Wall Pattern until Row 8.
Row 9:
- Chain 1, turn, work into the back loops only, make a single crochet into the back loops of the first 7 stitches, increase in the last stitch (9 single crochets now).
Row 10:
- Chain 1, turn, increase in the first stitch, single crochet in the next 8 stitches (10 single crochets now).
For Row 11:
- Chain 1, turn, single crochet in the first 9 stitches, increase in the last stitch (11 single crochets now).
Row 12:
- Chain 1, turn, increase in the first stitch, single crochet in the next 10 stitches (12 single crochets now).
Row 13:
- Chain 1, turn, single crochet in the first 11 stitches, increase in the last stitch (13 single crochets now).
For Row 14:
- Chain 1, turn, decrease over the first two stitches, single crochet in the next 11 stitches (12 single crochets now).
Row 15:
- Chain 1, turn, single crochet in the first 10 stitches, decrease over the last two stitches (11 single crochets now).
Row 16:
- Chain 1, turn, decrease over the first two stitches, single crochet in the next 9 stitches (10 single crochets now).
For Row 17:
- Chain 1, turn, single crochet in the first 8 stitches, decrease over the last two stitches (9 single crochets now).
Row 18:
- Chain 1, turn, decrease over the first two stitches, single crochet in the next 7 stitches (8 single crochets now).
Row 19:
- Chain 1, turn, work into the back loops only of the 8 stitches (starting the next side wall).
Roof Pattern (Make 2):
- With white yarn, chain 11.
Row 1:
- Starting from the second chain from the hook, make one single crochet into each chain.
Row 2:
- Turn, work into the back loops only, chain 3, slip stitch into the third chain from the hook to form a picot (shingle), skip a stitch, slip stitch, repeat to create five picots.
For Row 3:
- Chain 1, turn, single crochet into the front loops of Row 1 (not covered by picots).
Row 4:
- Turn, stagger the picots by slip stitching into the back loop of the first stitch, picot, repeat to create four picots.
Row 5:
- Chain 1, turn, single crochet into the front loops left from Row 3.
- Repeat Rows 2 to 5 once more, then finish with a row of picots, working under both loops as it’s the last row.
Base Pattern:
- Chain 8 + 1, then make 10 rows of single crochets.
Assembly:
- Join the base to the walls with reverse single crochets, matching rows and stitches.
- Sew the walls together and reinforce with cardboard coated with glue.
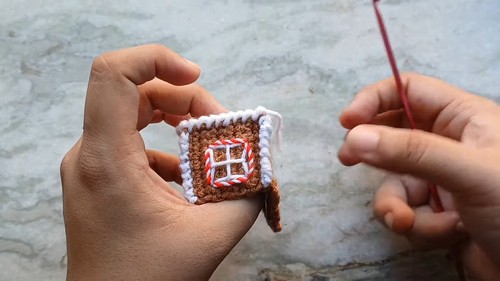
- Attach the roof using fabric glue and sew across the top edge with red yarn to create a candy cane effect.
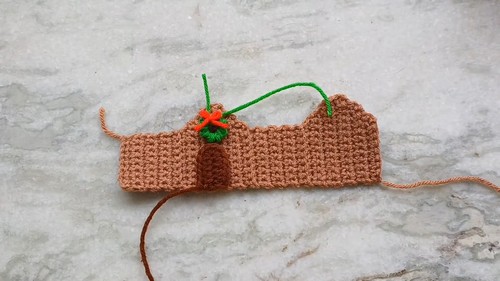
- Decorate the walls and roof with additional components like doors, wreaths, and windows before assembly for easier handling.
Additional Decorative Elements:
- The door is made with dark brown yarn by chaining 7 and then working half-double crochets creating a small rectangular panel.
- A wreath is crafted using green yarn and reverse single crochets around a ring formed by chaining and joining.
- Candy cane stripes around the door and windows are made by twisting red and white yarn strands together.